Pointing your domain’s DNS records to Mshini
Before your new WordPress website is able to go live with Mshini, your domain’s DNS web records first need to be configured to point to the Mshini server on which your new site has been provisioned. If your domain name was registered via Mshini, this would have been done automatically and you need not read any further.
To update your domain’s DNS web records to point to Mshini, you will need to contact your domain name administrator. Many domain name administrators and domain registrars provide their customers with control panels in which they’re able to perform DNS record updates themselves. You will need to contact your domain name administrator for more information in this regard.
Identifying your Domain Name / DNS Administrator
If you’re not sure who your domain name administrator is, you should perform a WHOIS lookup for your domain name. Browse to DomainTools, enter your domain name, and click on “Search”. This will display all of the WHOIS information for your domain name. Locate a section called “Name Server(s)”. The name servers are usually named after the company where you have the DNS records hosted. For example, if one of the name servers is called “DAVE.NS.CLOUDFLARE.COM” then the DNS records for your domain are hosted with Cloudflare.
Once you’ve identified where your domain’s DNS records are hosted, the next step is to contact them and request that they update your DNS web records to point to the IP address of the Mshini server on which your website has been provisioned. The Mshini server IP address is included in the email that you received from Mshini when you first ordered your Mshini account. Should you no longer have the email that we sent you, you may email us requesting the IP address associated with your Mshini account.
If your domain name administrator provides you with a control panel in which you’re able to perform DNS record updates, log into their control panel to change the DNS records. Below are links to the common DNS hosting providers with their instructions on how to access their control panels and update your DNS records:
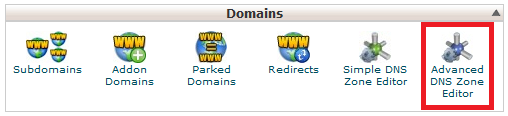
Creating / Updating DNS Records Yourself in cPanel
If your domain name administrator makes use of cPanel as a control panel, you may follow the below steps to create/update the DNS records for your domain:
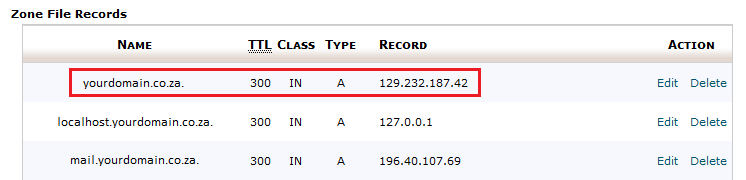
- Find and open the Advanced DNS Zone Editor tool in cPanel
- Update the yourdomain.co.za DNS record to point to the IP address associated with your Mshini account.
- The www.yourdomain.co.za DNS record should already be configured as a CNAME record pointing to yourdomain.co.za.
- Create a new staging.yourdomain.co.za DNS record as a CNAME record pointing to yourdomain.co.za.
General Instructions for Creating / Updating DNS Records
You will want to create/update the below DNS records for your domain:
| Record Name: | Record Type: | Points To: |
|---|---|---|
| @ or yourdomain.co.za | A Record | Mshini server IP address |
| www | CNAME Record | @ or yourdomain.co.za |
| staging | CNAME Record | @ or yourdomain.co.za |
Your @ record, also commonly known as the “naked domain”, should be configured as an A record and updated to point to the IP address associated with your Mshini account.
Your www record should be configured as a CNAME record pointing to your @ record. CNAME records are alias records, meaning that any update to your @ record will automatically affect your CNAME record.
You will likely not have an existing staging record and will need to create a new one. Your staging record should be configured as a CNAME record pointing to your @ record.
DNS record updates are subject to DNS propagation and may take up to 24 hours to effect. You may check on the status of your DNS record update by performing a DNS lookup on the MxToolbox website.


